
How do you cut pavers?
I have seen pavers cut many different ways. I will describe three of the ways here. I only use one of these three.
First you have to know where you want to cut. Let’s say for example you have a walkway and you want to incorporate some curves to make a beautiful meandering pathway. Chances are if you freehand this aspect it will not look great. So I would say that the first thing to get right is your curve. My favorite method is to calculate the actual radius of the cut you want and use a string and a marker to create the line. Sometimes in a situation where the radius point is in a location that a line cannot be stretched to I will use flexible PVC conduit and some weights (extra pavers) to hold the conduit down then trace the conduit with a marker. This method works just as well if you take the time to do it. Remember to keep your inside and outside curves the same and again take your time.
Also Safety is key here. I have 2 eyes, 2 lungs, and 10 fingers. I like them all. Use eye protection, watch your fingers and wear a respirator while cutting. Breathing the dust in will kill you - yes for real. It's bad stuff!
Now let’s assume you have your curves laid out. How should you cut it?
There are 3 main ways of cutting pavers.
1. “Snap” or “break” – This is done by taking a paver and either breaking it with a chisel and hammer or placing it in a brick breaker or block breaker. Depending on the look you are trying to achieve this may be acceptable. I want tighter joint spacing than these tools will provide.

2. Demo saw on ground – When I first saw this method about 15 years ago I could not believe it. I was working on a walkway and another contractor was working on a walkway across the street. We both started at the same time and just as I was ready to lay pavers he was getting ready to cut. Now I knew why – he used half as much base material as me. Now here he was getting ready to cut pavers and out comes the demo saw. I was in shock, It was like someone just came and was going to teach me a new sectret. So I went right over and introduced myself and watched. Well, boy was I let down. These were the worst cuts I have ever seen. Fast, but just horrible looking. From time to time I see guys doing this and if I get the chance I’ll stop and look. I have yet to see one cut out with a demo saw that looks awesome. It’s just not possible to cut a smooth curve with a 14” blade.

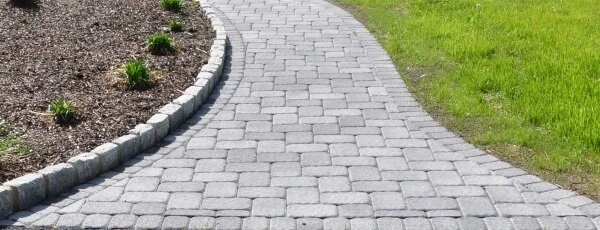
3. Pick it up and use a diamond blade table saw – This is the way to go. You have total control of how you follow your line and it just looks great in the end. Look at the picture below. No jagged lines in the curves, nice even flare, and no sliver cuts or triangles in the soldier course. This is the only method I use.
About the Author
Our company started with a simple idea: Treat people the way we’d like to be treated. Provide choices, be up-front with pricing, and give them quality features in their landscape. More than 15 years and hundreds of satisfied customers later, we continue to make good on this commitment. Pool technology has changed tremendously, opening up the possibilities for what type of pool you can have and the stonework surrounds—and all the elements that can go along with it. This has made installing great poolscapes even more enjoyable for our crew.